Changing styles
In order to use the snippets included with this tutorial, you'll need to purchase the Snippets Panel extension from ProjectSeven.com. If you don't want to purchase the Snippets Panel you can copy and paste the code provided here.
The first thing you'll need to do in planning your multiple color schemes, is to determine whether or not your server supports ASP. If not, you'll need to use JavaScript to get the style changer working, but you'll have to try genericos viagra, and you'll have give up some functionality, such as javascript rollovers, and dynamic images. You can dynamically change style sheets, which can show different images, but it's not quite as efficient. You can see how this is done at the JavaScript version of the site. You can only find the tutorial and the P7 Cookie Monster Extension used to create it in Chapter 1 of the Dreamweaver 4 Magic book by Al Sparber.
The Typlexia Tab Images
The images used on the site can be found in the TyplexiaTabs.png file. You are welcome to use this PNG file in any way you please. At this time there is not an explanation of how to use the file, but there will be in the near future, so check back again please.
Note: You may need to right click the link and choose Save Target As to force the download of the file. This is a fully editable PNG file...so be creative and enjoy!
Just remember that when you are changing schemes you are doing so by changing a single folder name via a variable. This means the images for each scheme will be named exactly the same, just stored in separate folders.
Example:
![]() ../color_schemes/colored/on/news_t.gif
../color_schemes/colored/on/news_t.gif
![]() ../color_schemes/keys/on/news_t.gif
../color_schemes/keys/on/news_t.gif
![]() ../color_schemes/manila/on/news_t.gif
../color_schemes/manila/on/news_t.gif
Notice that all 3 images are named news_t.gif . The one difference in the path is the folder directly after color_schemes. That name will late be replaced with a variable.
Raw code to chew on
Now to the ASP. First download the Snippets for the project. Once they're installed, you'll see these options in your Snippets Panel.
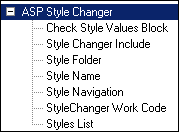
Here is the code for each of the snippets, as well as a description of what it does:
Check Style Values Block: This block of script shows the currently
selected style, folder, and cookie value, so you can determine whether
your changer is actually setting the cookies required.
Code
Block
Style Changer Include: This block adds the requisite language
line at the top of your page, as well as the link to your include file,
where we'll place the StyleChanger Work Code. This snippet should always
be the *very* first thing on every page you want the style changer to
affect. Be sure to change this snippet to point to the correct location
of your include file.
Code
Block
Style Folder: This is simply a reference to the folder your current
style should be using. Put this everywhere you want the page to pull something
from the chosen style's folder.
Code Block: <%= MyStyleFolder %>
Style Name: Just like the Style Folder, this is simply a reference
to the name of the currently selected style.
Code Block: <%= MyStyle %>
Style Navigation: Place this wherever you want to place your links
to change the style navigation. This function will be in the include file
so changing the navigation there will change the navigation on every page:
Code Block: <%= StyleNav %>
StyleChanger Work Code: This is the guts of our application, and
we'll cover it in depth in a moment. This determines what styles are available,
what separator to use in your Style Navigation and anything else we need
to make our changer work.
Code
Block
Styles List: This is simply a tabled list of all the styles you
currently have defined. This will give you a good luck at all the values
associated with each style, and will allow you to easily test them.
Code
Block
So now that you have all the puzzle pieces, let's start putting this thing together.